What's so special about Little Windows Resin?
Our proprietary epoxy resin formula is the best ever! Developed for use with photos and other delicate items, it's the safest 2-part mix you'll find. I wanted something you could use at your kitchen table, so this is not a toxic product and doesn’t have the wicked smell you find with most resins.
Beyond its great performance with casting, doming, layering, coating and filling bezels and other forms, the basic advantages are:
* One single formula can Cast, Dome, Layer, Fill Bezels, and be a 1-coat Varnish!
* Blends easily, so you won’t get sticky spots
* Small mix quantity required (1 tbsp per batch), so no waste
* Not a toxic product
* No bad odor
* Very low bubbling
* Can put anything into it, even delicate items
* Works well with other mediums and favorite supplies
* 30+ minute working time, 12 hour cure
* Crystal clear and color stable
How do I mix Brilliant Resin?
Little Windows Brilliant Resin is a pure formula without solvents or dangerous additives. The 2:1 mix ratio is crucial, but you can double or triple your batch size as needed:
1. Mix 2-parts of A with 1-part of B (e.g.; 10ml + 5ml).
2. Stir slowly for 2-1/2 minutes, until swirls disappear.
3. Let rest for 5 minutes*, then skim off any remaining bubbles on surface.
4. Pour slowly into mold when casting, scoop onto items when doming, or drip into bezels. Allow to cure for at least 12 hours before handling.
*You can mix larger batches too, but after mixing you'll want to divide it into separate cups for the resting period, about 2oz. per cup or less. Brilliant Resin was developed for use in jewelry making and other small crafts, and it generates quite a bit of energy so that even tiny applications set up properly within 12 hours.
How long do I have to use the resin I've mixed?
That depends on the project you're making. Once mixed, and allowed to rest for 5 minutes, here are the windows you'll want to work within:Casting with photos/other flat paper - pour the resin into your molds right after it rests, get your photos in while it's as liquidy as possibly, so bubbles have the best chance to rise and pop.
Casting with loose elements - add resin first, then add elements, your resin will be workable for up to 20-30 minutes after resting. Even if it thickens up, as long as your elements aren't really porous (bubble-making), you still have time to add things.
Layering in molds - allow each layer to set up for at least 3 hours before pouring next layer.
Doming - you can apply your resin right after the 5 minute rest period, or let the resin thicken for up to 25-30 minutes.
What can I put into the resin?
Almost anything you like! Paper, plastic, fabric, metal, clay, wood, natural elements, glitters and powders, and any combination of these elements work well. Things that contain moisture should be avoided, for example, fresh flowers and leaves. The water will react with the resin, turning the leaves and petals brown. Dried flowers and leaves work beautifully. There are some things that don't look so great - iridescent feathers will lose their shine, locks of hair may clump together and look like a claw.
How Long Will It Take For My Pieces To Harden?
Little Windows Brilliant Resin is designed to set up in 12 hours, so you can remove it from your molds or Doming Tray after that time. For the first day your pieces will be a bit flexible, so this is the easiest time to drill and finish your creations. If you'd like, you can bend them into different shapes (watch our Bendy Rings Video for How-To's). They should not be sticky.
Is Little Windows toxic?
For most humans, properly used, our resin is not a toxic product. In fact, it's the safest epoxy you'll find, it does not contain chemicals which produce dangerous off-gassing that can lead to chronic issues. There are no solvents, nor any nonylphenol, which is a dangerous chemical contained in Part B of most other resins you'll find. Also, ours doesn't have a stinky or strong odor.
Even though its safe for most humans, our labeling works to prevent the extreme possibilities of misuse - as you'll see, the directions cover mostly common sense things (don't drink it, don't get it in your eyes), as well as "avoid breathing fumes and getting on skin" because if people sniff directly from the bottles or leave it on their skin for extended periods, it can be irritating.
Whether or not it is completely non-toxic depends on how you use it/misuse it, your history with respiratory issues, and your chemical sensitivities. Another thing you'll note in our directions is "keep out of reach of children", another plea for common sense. We don't want kids or pets ingesting it, or getting it on your carpet, where it's difficult to clean up.
Click to view Little Windows Brilliant Resin SDS 
My Part A is cloudy or thick
Little Windows Brilliant Resin is a proprietary, pure formula, which starts life as a solid. If it gets colder than it likes, it can begin to crystallize and thicken, and may even solidify. You can remedy this by heating your Part A, and the easiest way to do that is in the microwave. Remove your cap and microwave for 10 seconds. If not clear and thin, replace the lid and shake a bit to blend in any crystallized resin around the inner neck of your bottle, then remove lid and heat for an additional 10 seconds.
For safety, do not heat more than 30 seconds total as it may be too hot to handle. Allow it to come back to room temperature before mixing in with your Part B. This can be repeated as necessary.
WARNING: DO NOT MICROWAVE ANY OTHER BRAND OF RESIN OR TYPE OF CHEMICAL, AS THEY CAN RELEASE HARMFUL GASSES. Little Windows Brilliant Resin formula complies with FDA standards for food safety, and does not contain any solvents.
Can I color the resin?
Yes, and there are many way to color Little Windows brilliant resin, depending on the look you're going for. Dyes, glitters or pearl powders, metal flakes or mica, oil paint, and acetate. Since our molds are so reflective, I prefer using clear acetate in the color of my choice, cut a piece to fit snug at the bottom of my mold, then cast the piece. The molds will reflect whatever color or texture you put at the bottom of the resin, up and around the sides, making it look as if the piece is colored throughout. If I need to layer, I'll let the first layer with acetate set up, then add more resin and elements on top.
Can I use this in metal bezels and frames?
Yes! If you're going for a domed look, I suggest adding a bit of resin in the bezel, then adding your element, pressing down to squish any bubbles out from under it. Then add a bit more resin and allow to set for 5-10 minutes so that any remaining bubbles can be dealt with before adding the final bit of resin to dome it up. If you're not sure if there are any bubbles, let the first layer set up before adding any additional resin, to ensure your results.
Can I put crystals in resin?
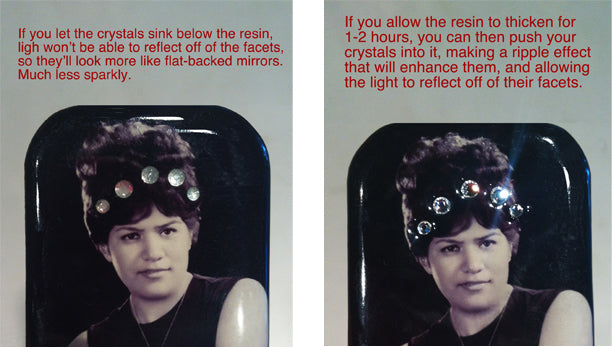
I love the sparkle of crystals, and you can add them to your resin projects, but if you let the facets of the crystal sink below the resin, the light will no longer be able to reflect off of them, and your crystal will look like a flat-backed mirror. So, there two ways to keep that sparkle: 1) pour a super-thin layer of resin, so the dimension of the crystal sticks out above the resin, or 2) let your resin set up for 1-2 hours, so it's firm enough to support the crystal, but still sticky enough to bond. This can be tricky and you'll have to experiment a bit to get a feel for timing. I use a pin or the tip of my mixing wand to test the set. If you miss the firm/sticky window, you can also glue your crystals on after the resin is fully set, using ZapAGap and a pin or toothpick to apply.

Sticky resin pieces?
If your pieces are all sticky after 12 hours, that's an indication that the mix proportion was off. No matter your batch size, you should always mix Little Windows with 2-parts resin (Part A) to 1-part hardener (Part B). If only some of the pieces within your batch are sticky and others set up fine, that means the mixture was not fully blended. Be sure to mix for the full 2-1/2 minutes, scraping the sides and bottom of your mix cup, then allow the mix to rest for 5 minutes before pouring. This allows continued blending on a finer level, so the chemicals can begin to bond.
What's the shelf life, and how can I extend it?
Our proprietary formula should have a good year before the Part B begins to yellow slightly. After that it's still perfectly functional and works well for projects like DichroISH, where the color of the resin doesn't affect your outcome. For best results with photo jewelry, you want clear fresh product. Like any couple, Part A and Part B have different preferences. Here are some tips to optimize the shelf life.
TIPS:
Always wipe bottle necks clean and recap tightly soon after pouring.
Weather and sun exposure can affect shelf life. Keep Part A at room temperature. If Part A becomes thick or cloudy, remove cap and microwave for 5-10 seconds. Do not heat if already mixed with Part B. * DO NOT HEAT ANY OTHER RESINS OR CHEMICALS AS THEY CAN RELEASE DANGEROUS GASSES *
Part B prefers to be cool and doesn’t like humidity. Keep it cool (you can even refrigerate), keep out of sunlight.
My Part B is turning yellow
Little Windows formulas are pure and safe, but as with many epoxies, the shelf life on your Part B is about 1 year, if stored properly. Once it starts to change color, it will still be functional well beyond that time, but it will be better used in projects that don't require the crystal clarity, so save it for Dichro-ISH, adding glitter, fabrics, dyes, powders, or other elements, where the clarity isn't crucial. If you're working on photo pieces, it will be best to use fresh product. We offer replacement bottles of Part B, or new sets in different sizes.
Can I use other Resins?
Although you never want to mix different brands or types of resin together while wet, you can use Little Windows Brilliant Resin to coat other types of resin, as long as they are cured and clean.
Brilliant Resin is the safest epoxy you'll find, without the solvents and toxins that are common with other brands. Each resin product on the market was designed to be used in a specific way. Some are made to coat wood surfaces, others for casting large pieces, or making repairs. If you want to create small, shiny things like jewelry, accessories, buttons and embellishments, that's exactly what Little Windows Brilliant Resin was developed to do.
Another benefit is that our resin does not generate a lot of heat while it's curing. Resins that cure hot may damage your molds, and the elements you add. If you choose to use products from other manufacturers, please make sure to follow those manufacturers' instructions, and you may need to experiment to achieve the results you're looking for.

