


You'll also need
- Large, thin, easy-to-bend jump rings, or wire to connect your panels
- Sharp scissors
- Double sided tape
- Chipboard or cardboard
- Paper towels
Please save, share, and follow us:
YouTube Channel Pinterest Facebook Instagram
I LOVE these resin pieces! What a great idea for parties, weddings, Mother's Day Keepsakes, or just to have on your desk day and night. Here's a new way to showcase your pictures.
![]()
Step 1: Print your images on Clear Photo Film with an inkjet printer set to the best quality available. Cut them apart and round the corners.
![]()
![]()
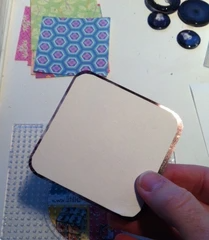
Step 2: If your cut-outs are over 2", you'll want to support the back while you dome the front side, so they won't warp or curl as you apply resin. Cut chipboard or cardboard just a bit smaller than your piece to be domed, and lightly tape it to the back side. Place on your Doming Tray (Small Doming Tray shown here, but this project is easier to make on our Large Silicone Doming Tray).
Step 3: Mix and pour side 1. Since you're going to flip this over and dome the back side too, you'll want to make sure the resin is hard enough that it won't dent on the little fingers, so allow to set for 24 hours before flipping.
Step 4: Remove the support pieces and tape and dome the back side. Allow to set up for at least 12 hours before handling to prevent fingerprinting.
Step 5: Drill corners, insert jump rings or wire, and enjoy!
![]()
Of course during the making of this video I thought of about 25 more projects using this technique. Send me your ideas too and we'll add them to the mix!
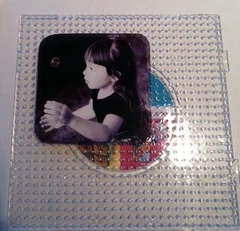
Here's an example I made using the same technique, but printing in color and cutting around my lovies. I leave it open on my desk when not in use:
![]()
These can be assembled to surround a candle, or you can just leave them out in an accordian so you can see them. What a great piece for a desk or near a window.
MORE IDEAS using the same awesome products:


