
Casting (using molds)
Casting is pouring resin into a some sort of cavity you intend to remove it from when cured. Resin molds can be made of different types of plastic, or from silicone. The finish you get is determined by the surface of the mold. You can use a variety of molds to create your shapes.
Here's a basic how-to video:
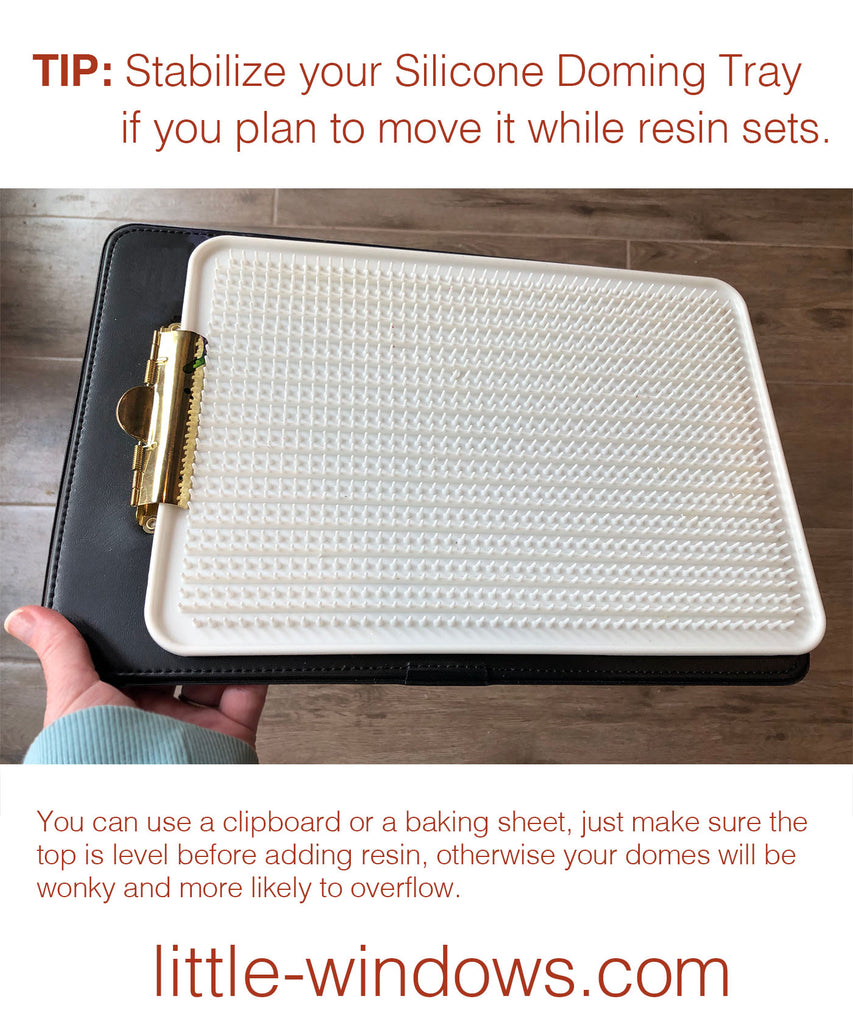
Doming (using surface tension)
There are two things needed for successful doming: 1) A resin with high surface tension, designed to work on photos, papers, and other flat materials, and 2) A doming tray, which elevates and supports your cut-out shapes, creating clear edges that tell the flowing resin where to stop.
Here is a Doming How-To Video:
If you're doming larger pieces (over 2"), especially with the Clear Photo Film, or long pieces, you should stabilize them by adding a stiff paper like cardstock to the back before adding resin. This will keep your pieces from curling up as they set. You can use a few small pieces of double-stick tape to attach them. Here's an example:

_

_
Layering
Little Windows Brilliant Resin layers beautifully and seamlessly. You can pour thin or thick layers to add embellishment, and create dimension and 3D effects. Allow your resin to set up 3-6 hours between layers, depending on the weight of what you're adding to the next layer. Example: if adding heavy metal charms to the layer, let previous layer set up for about 6 hours so the charm doesn't push down into the layer below. If adding lightweight elements, 3 hours should be fine.
Here's a basic How-To Video for layering photos over a variety of materials:
And here's another video all about layering photos:
Embedding (putting stuff in resin)
You can put almost anything you want into Brilliant Resin! Paper, plastic, fabric, metal, clay, wood, natural elements, glitters and powders, and any combination of these elements work well.
Things that contain moisture should be avoided, for example, fresh flowers and leaves. The water will react with the resin, turning the leaves and petals brown. Dried flowers and leaves work beautifully.
Then there are some things that just don't look so great - iridescent feathers will lose their shine, locks of hair may clump together and look like a claw.
Here's a basic video on embedding a bunch of different elements in resin:
Teaching Resin
Do you love working with resin? We have a program that lets you earn money by teaching - anywhere, at anytime, to anyone. With a minimum of 6 students (or 2 classes of 3 people), you can get started. We will include an outline describing how we teach classes to help you prepare.
Here are the details:


Adding Findings to your Resin Creations
There are many ways you can add findings to your resin creations, turning them into jewelry, accessories, buttons, or decorative items like the ones shown below.
SCROLL DOWN FOR HOW-TO VIDEOS
Drill a hole:
You can drill holes into or through your resin pieces. Then you can either glue in an eye-screw, or add a jumpring or a wire through the hole. If your piece is clear, drill at an angle so the finding will hide the white drill line.
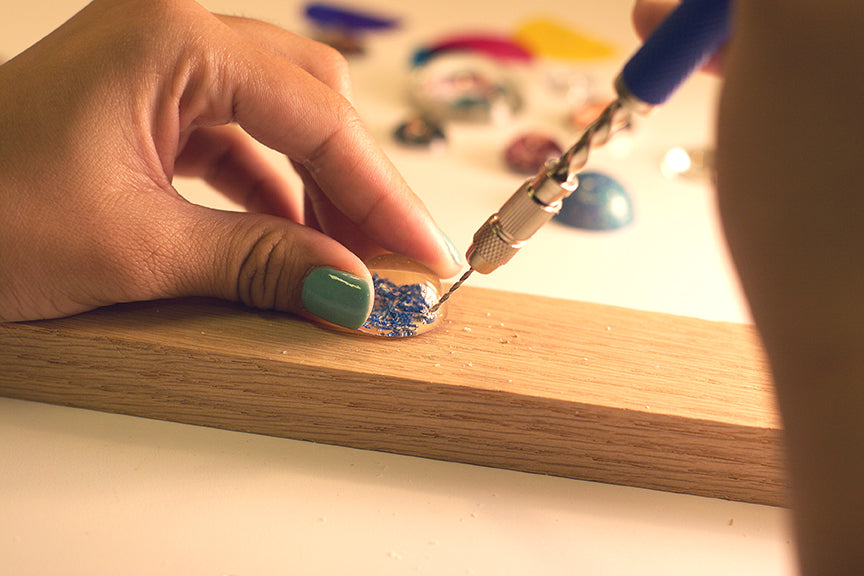
If your piece is colored, you can drill straight in and then glue in an eye-screw finding.

Embed findings in resin:
Once your piece is made, you can add another thin layer of resin to the back and embed a finding, to make a bail or link, or turn your pieces into all types of jewelry, buttons, and decorative pieces, like the handles below.


Glue on flat-back bails:
A drop or two of resin is the very best way to create a permanent, waterproof bond, but if you don't have any handy you can also use E6000 or another strong adhesive.


Wire wrap your pieces:


Finish your resin creations using headpins and jumprings as findings:
In this how-to video, you can fast-forward to 11:38 for a focus on findings:
And here's a demo of clean and easy drilling with our Spring Drill:
What's so special about LW photo papers?
We offer two kinds of photo paper. They are both waterproof, and make a permanent bond with printer inks so you won't see any smearing or bleeding of your photos.
The first type is bright white, and can be used with both inkjet and laser printers. It's available in both 4x6" and 8-1/2 x 11" sheets.
The second type is our Clear Photo Film, and can only be printed on inkjets, as laser printers get too hot and can warp the film. It's designed for photography, so the resolution is wonderful. This type is available in 8-1/2 x 11" sheets. Plan on adding resin to both sides of this film for durability, and more of a glass-like look.
Can I use any photo paper?
Normal photo paper is often porous and can absorb the resin, making your image blotchy or discolored. Unless you'd like to do some experimenting, it's best to use the Little Windows Special Photo Paper, which is waterproof and forms a permanent bond with your printer inks, so that when you place it in your liquid resin, it won't bleed or run.
If you have any other types of paper or printed photos you'd like to use, you can add a waterproofing coating like Mod Podge to both sides and edges. Allow to dry completely before applying resin.
Basics
Tools - wipe cups and wands clean with dry paper towel.
Molds - allow resin to dry, then pick off with fingernail - no need to wash Little Windows molds, that will only leave a residue.
On hard surfaces - wipe with dry paper towel, remove residue with cleaner like Simple Green or acetone.
On soft surfaces (fabric, carpet, hair, etc) - this is the hardest, you will want to wash with dish soap before it cures, until no longer sticky.
On skin - wipe with dry paper towel, then wash with dish soap until no longer sticky.
In eyes - wash with cool water for a minimum of 15 minutes, see a doctor if swollen.
The paper won't feed through my printer
Our bright white photo paper may be thicker thank your printer is used to, so you may need to either help push it through gently with your hand, or use the flat feeder (if your printer has one). If it still won't feed, try using your fingers to slightly bend the first 1/4 inch of the sheet up, and cut off the top left corner. That should help feed heavy papers through.
To feed the smaller 4 x 6" paper, use the arm for envelope feeds, pushing it over to the correct width, and the paper should feed through. If you have an older printer, you may need to tape the smaller paper onto a sheet of 8-1/2 x 11" regular printing paper. Line up the small sheet in the top left corner of the big sheet, and put a piece of scotch tape only along the top edge. This can trick your printer into thinking you're sending through a sheet size it prefers.
Please check the online user guide provided by the manufacturer who made your printer for more details.
Feeding Paper Into Finicky Printers
As mentioned before, our bright white photo paper may be thicker than your printer is used to, so you may need to either help push it through gently with your hand, or use the flat feeder (if your printer has one).
If it still won't feed, try using your fingers to slightly bend the first 1/4 inch of the sheet up, and cut off the top left corner. That should help feed heavy papers through.
Click the link below for a how-to guide for working with printers that don't seem to want to accept our papers.
Guide for Feeding Finicky Printers
If that doesn't work, try taping a piece of clear tape along the top edge, folding it over to the back so it sticks to itself. This gives the printer rollers a chance to grab onto the sheet a bit more easily, and can trick it into thinking it's thinner paper.

Are The Mixing Cups And Wands Reusable?
Yes! After you've finished pouring your projects, use dry paper towels to wipe clean your cup and wand. If the resin has dried in your cup, you can roll the cup in your palms to loosen the dried bits, then pick them out with a fingernail.
I got resin on my skin, how do I get it off?
First, wipe off as much as you can using dry paper towels, then wash well with dish-soap until you're no longer sticky. Baby oil works well, as do orange-based cleaners. Little Windows resin is not a toxic product, but it can cause irritation if you have sensitive skin. Get medical attention if you see swelling. If you get it in your eyes, flush with water for 15 minutes and get medical attention. Keep eye lids apart. If someone drinks it by mistake, give them large quantities of water and get medical attention.
What Can I Do To Minimize Bubbles?
How Do I Even Out My Top Edges?
When you're working with molds, the resin creeps up the sides a bit, so your top edges will be a bit higher than the middle. This enhances the beautiful reflections around the sides of the piece - the higher the sides, the more dramatic the reflections you'll see.
Sometimes you might want them lower, or smoother. There are two ways to do this:
You can simply trim around the edges and corners using small, sharp scissors, or you can sand them down using fine-grit (600+) wet/dry sandpaper you'll find at any hardware store. Before you begin sanding, you might want to use your scissors to trim the edges and corners down. Then, wet the sandpaper, place your piece face-down on the paper, and rub it around in a circle until you achieve the look you like. Just be careful to stop before you begin to scratch the face of your piece. Then dry off your piece using a paper towel or tissue.
Another fun technique to make your pieces smooth and rounded, is Doming-Up (see How-To Video in our Project Center), which is adding a domed layer to your cast pieces. You can embed anything into this second layer, to create beautiful dimensional effects!