
Adding Findings to your Resin Creations
There are many ways you can add findings to your resin creations, turning them into jewelry, accessories, buttons, or decorative items like the ones shown below.
SCROLL DOWN FOR HOW-TO VIDEOS
Drill a hole:
You can drill holes into or through your resin pieces. Then you can either glue in an eye-screw, or add a jumpring or a wire through the hole. If your piece is clear, drill at an angle so the finding will hide the white drill line.
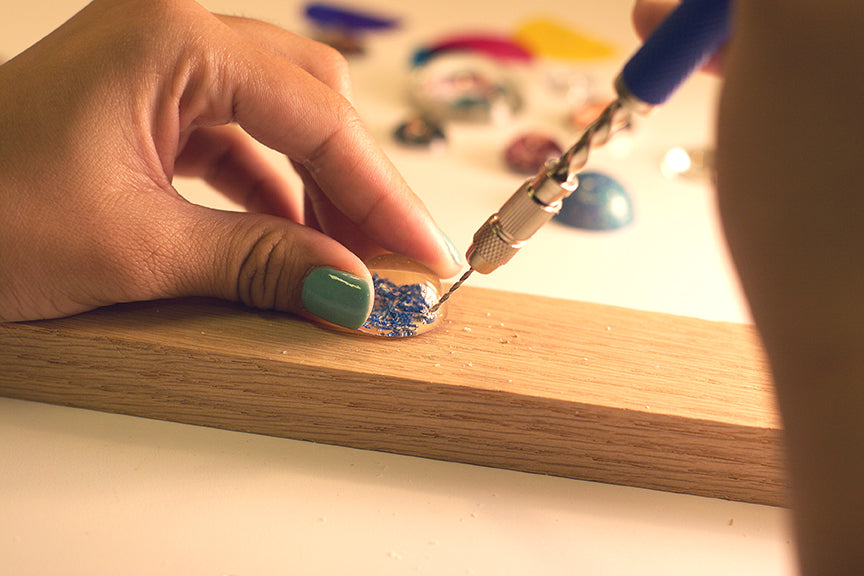
If your piece is colored, you can drill straight in and then glue in an eye-screw finding.

Embed findings in resin:
Once your piece is made, you can add another thin layer of resin to the back and embed a finding, to make a bail or link, or turn your pieces into all types of jewelry, buttons, and decorative pieces, like the handles below.


Glue on flat-back bails:
A drop or two of resin is the very best way to create a permanent, waterproof bond, but if you don't have any handy you can also use E6000 or another strong adhesive.


Wire wrap your pieces:


Finish your resin creations using headpins and jumprings as findings:
In this how-to video, you can fast-forward to 11:38 for a focus on findings:
And here's a demo of clean and easy drilling with our Spring Drill:
How Do I Even Out My Top Edges?
When you're working with molds, the resin creeps up the sides a bit, so your top edges will be a bit higher than the middle. This enhances the beautiful reflections around the sides of the piece - the higher the sides, the more dramatic the reflections you'll see.
Sometimes you might want them lower, or smoother. There are two ways to do this:
You can simply trim around the edges and corners using small, sharp scissors, or you can sand them down using fine-grit (600+) wet/dry sandpaper you'll find at any hardware store. Before you begin sanding, you might want to use your scissors to trim the edges and corners down. Then, wet the sandpaper, place your piece face-down on the paper, and rub it around in a circle until you achieve the look you like. Just be careful to stop before you begin to scratch the face of your piece. Then dry off your piece using a paper towel or tissue.
Another fun technique to make your pieces smooth and rounded, is Doming-Up (see How-To Video in our Project Center), which is adding a domed layer to your cast pieces. You can embed anything into this second layer, to create beautiful dimensional effects!