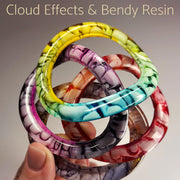

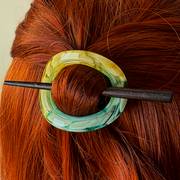

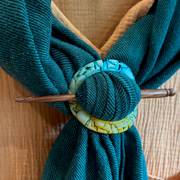


I got so many questions on how I made the cloud effect resin frame in my photo cabochons video, and I’m always looking for new ways to restrain my hair. You’ve also asked for more ways to use the larger sizes in our Oval Cabochons Molds, so in this video I show you how to make resin jewelry and hair clips, I hope to get you inspired to make some yourself!
I love hair clips, hair bands, and hair ties, but some work better for me than others. It’s also hard to find interesting and unique ones, or ones that coordinate with a particular outfit. So I’ve started making my own, and I’m loving these. The pieces I’m making today can be used to make hair clips, pendants, frames, and even scarf clips.
I’ll be working in my Creation Station. It has a great amount of space, an easy-clean base, I can move it around if I need to, and even stack them up to make more space. And yes, I DO want you to buy the products I develop. I put my heart into these tools, supplies and videos so thank you for supporting little-windows.com! If you don’t have a Creation Station handy, you can use the packaging from this mold set as dust covers.
Brilliant Resin is the best 2-part epoxy, it’s the safest you’ll find and it comes with mixing cups and mixing wands. These wands are the perfect shape for mixing every bit in the cup, and for applying resin.
I’ll make wider frames using the bottom side of my resin mold. My guide tells me how much resin I’ll need to mix for every size and shape. I’ll be making quite a few so I’ve also got a larger silicone mixing cup. This is an Easy Batch cup, Since I’m working with 2:1 ration resin, all I need to do is pour my Part A up to the “A” line, and my Part B up to the “B” line. The other side has standard measurements in case you’re using a 1:1 ratio resin. I’ll show you how to clean these cups at the end of this resin jewelry video.
I’m using alcohol inks from my Rainbow Colors and Sparkle & Shine Sets, and this Deep White sinker ink to create cloud effects.
I’ll use E6000+ adhesive to finish these pieces. It’s low odor and remains flexible once cured.
I just had these beautiful carved wood hair sticks made. They measure 6” and I’m offering a 2-pack and a pack of 12-pack.
I’ll also need a couple of toothpicks, and I always have my box of 1,000 Tiny Pointy Swabs handy
These resin molds are perfectly tooled and made of clear, high quality silicone so your castings will come out super shiny. I’ll use packing tape to make sure they’re clean before I get started. These molds work well with both epoxy and UV resin, but for THIS project you’ll need an epoxy like Brilliant Resin - UV resins WON’T work.
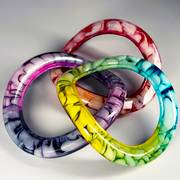
The cloud technique is a simple variation on the petri technique done with alcohol inks. This has been around for a while, some of my favorite makers have put out videos on this technique. If you saw my photo cabochons video you saw one example I used there as a frame. You can use any color combination you like I’ll be using
Blue, Green, & Yellow
Pink & Orange
Amethyst & Anthracite
Before I get started, be sure to sign up for my little-windows.com e-newsletter. You’ll get special deals, new product announcements, and more detailed resin tutorials to check out.
If you’ve signed up but aren’t getting them, they may be getting filtered, so make sure to move us to your primary folder, and add little-windows.com to your safe sender list.
I’m using Brilliant Resin 2-part epoxy resin. Chemistry differs between resin brands, Brilliant Resin was developed for projects like this, it’s the safest epoxy you’ll find, and it’s super versatile. Make sure your space is well ventilated - especially when you’re using alcohol inks, and wear gloves for messy projects. Make sure your resin mold is nice and clean.
I’m wearing gloves this time because I just got a manicure, and this project is messier than my usual work. It’s always a good idea to protect ourselves. I’m working in a space that’s well ventilated, this is important when working with resin and with alcohol inks.
For the Cloud Effect, after about 30 min to 1 hour, you’ll see the resin becomes stringy. I’m going to swish two of these, and leave the other 2 alone. Let’s see how the patterns I pour and swish affect the final look. You can make any pattern you’d like, just be careful you don’t go too deep and scratch your mold.
I’ll cover these and let them set up for about 12 hours. They’re ready to demold! I’ll loosen my casting from the mold all the way around, then push the center down and pull out your frame. The high quality of these resin molds really shows here, all of these will be smooth and shiny.
The edges can be messy, so I’ll use my curved scissors to trim the outer edge smooth. Now for the inner ring. You can use the same curved scissors, or an X-acto craft knife. For me the easiest way to do this is to hold my piece, and pull my knife toward my thumb. This takes some practice, so be careful.
Adding alcohol ink to resin causes it to cure more slowly. That’s just what we want, as it makes them easy to trim, and keeps them bendable that first day.
These will work best for hair if they are curved, to follow the shape of your head, and to make a valley for the hair stick. I need to wrap these bendable pieces around a cylinder, and hold them in place until they fully cure.
Here I’m using a plastic container. I also rolled up paper to make a tube that’s about 3-4”
I bend my pieces around the tube and tape both sides.
Now I need to leave these to fully harden, which should take a couple of days. You can leave them this way for as long as you want.
They are firm and ready to finish.
I’ve been using the bottom of the mold because I wanted wider frames, but you can make thinner ones in the top of this mold if you’re doing simpler color techniques. Loving how these turned out. To keep my hair clips from sliding down my hair, I’ll add a bead of E6000+ It’s low odor and stays flexible over time. Apply a bead along the sides and let that set up for a day. You can use the tube to spread it to the edges, or a Mixing Wand, it’s not something to waste a whole glove on but you can use a finger cot.
It’s important to spread it out to the edges so it can get a good grip on your hair.
On this one I only need a bit in the center parts.
You can also just put dots for these small ones.
This skinny one just needs a little bit. Any extra blobs can be wiped away with a baby wipe
I like to store my glue tubes in plastic to help keep them from drying out.
I made this one about a year ago and the E6000+ is still perfectly bonded, and it still feels rubbery which keeps it from slipping.
Here are the clips I made today!
I didn’t have a model today so I used my cheap Halloween wigs.
You can also use 2 sticks for extra hold, or an interesting look.
CLEANING UP RESIN: After your resin has dried you can flip these cups inside out and use packing tape to remove any residue. If you have any alcohol ink on your mold, you can clean it off with alcohol and a soft wipe.
I’m so happy with how these turned out, which is your favorite?
You’ll only find these molds at little-windows.com, click above for links to this set and all the resin art supplies I use.
- All Effects
- 3-D
- Bendy Resin
- Bezels
- Casting
- Thin Coat/Varnishing
- Dichroic/Color Shift
- Doming
- Doming-Up
- Double-sided Doming
- Flowers in Resin
- Embedding Elements
- Feathering/Swishing
- Glow In The Dark
- Ink Effects
- Layering
- Making Multiples
- Marble Effect
- Ocean Looks
- Personalizing
- Petri
- Punch Projects
- Resin On Fabrics
- Resizing Images
- Ripple Effect
- Special Effects
- Stamping
- Stone Effects
- Surface Finishes
- Twisted Resin
- Wire Work
- All Types
- 3-D Projects
- Bookmarks
- Bracelets
- Buttons
- Cabochons (half-spheres)
- Candle Votives
- Charms
- Coaster
- Cosplay/Costumes
- Decor
- Dishes/Containers
- Earrings
- Fandom
- Frames
- Games
- Hair Accessories
- Heart Shaped Projects
- ID Tags/Markers
- Keychain
- Knob/Pulls
- Magnets
- Memorabilia
- Necklaces
- Ornaments
- Paperweight
- Patriotic
- Philatelic (stamps)
- Photo Keepsakes
- Pins
- Prayer Beads
- Resin Eyes
- Rings
- Sun Catchers
- Zipper Pulls
- All Events
- All Special Events
- All Holiday
- Pets
- Ancestry/Family
- Wedding
- Anniversary
- New Baby
- Faith
- In Memory of
- Solidarity/Awareness
- Game Day
- New Year
- Valentines
- Easter
- Mother's Day
- Graduation
- 4th of July
- School Days
- Halloween
- Christmas
- More Special Occasions
- All Materials
- All Resin Colorants
- All Organic Matter
- Alcohol Ink
- Acrylic Paint
- Ashes
- Beads
- Black and White Looks
- Candy
- Clear Photo Film
- Color-Shift
- Crystals
- Dichro-ISH Films
- Dried Flowers
- Fabric/Fiber
- Glitter
- Glow In The Dark
- Hair
- Liquid Colorants
- Nail Polish
- MakeUp
- Metal
- Mica Powder
- Mixed Media
- Papers
- Photos
- Plastics
- Polymer Clay
- Postage Stamps
- Resin Color Film
- Sand / Stones
- Sequins
- Shells
- Shrink Films
- Stickers
- Washi Tape
- Wire
- Wood

