


You'll also need
... some different materials depending on the project you want to make:
Skull and Spiders Necklace:
- 1 Straight pin, 1 Skull charm, 3 Spider charms, black jumprings or wire
- Tweezers, jewelry pliers, paper towels
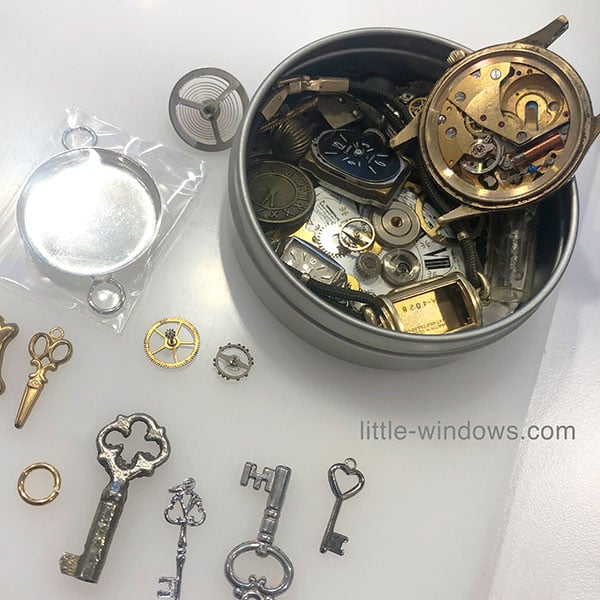
Clock and Kitty Pin:
- Watch gears and hands, Small figure (my cat came from a bubblegum machine)
- Large pin with 1-3 rings (click here for the one I'm using), jump rings in any color, charms
- Tweezers, jewelry pliers, paper towels
Sally Photo Necklace:
- Images and a way to resize them to fit (our online Photo Cropper is the easiest way)
- Clear Photo Film and a good quality color inkjet printer (or we can Pro Print for you)
- Open-link necklace chain, charms to hang from each bezel (I used 1 flower charm + 2 black crystal charms)
- Scissors, jewelry pliers, paper towels
Butterfly Crystal Collage Necklace:
- Rub-On Transfers - any designs, words, or letters you like, and a stylus, or a pen, or other hard, rounded tool.
- Flat back crystals
- Black satin ribbon and beads or a charm for the bottom
- Tweezers, jewelry pliers, paper towels
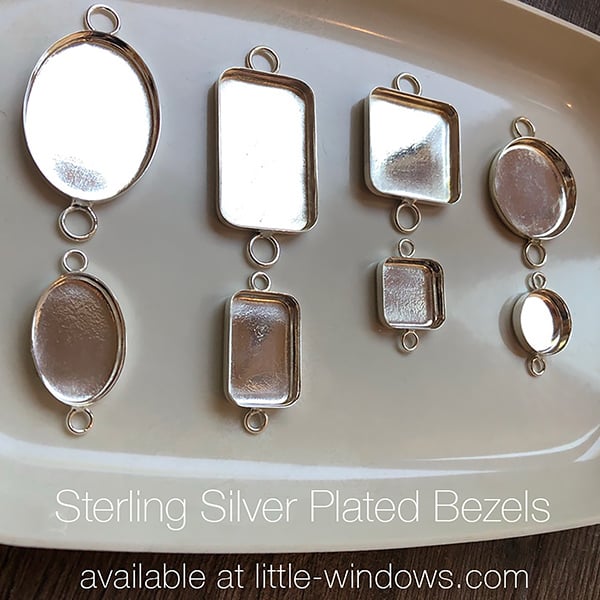
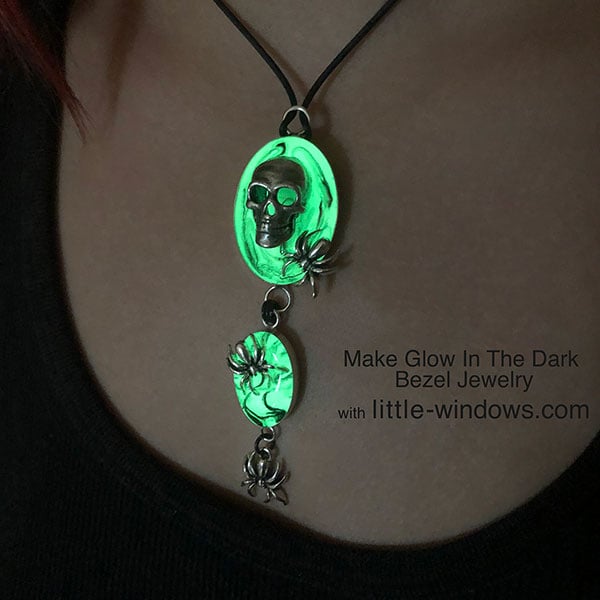
There are 4 different projects in this tutorial, but they all combine our Medium and Small Sterling Plated Bezels, and start with a layer of our Glow In The Dark Additives mixed into our Brilliant Resin.
After that the techniques differ for each project, here are the details for all 4:
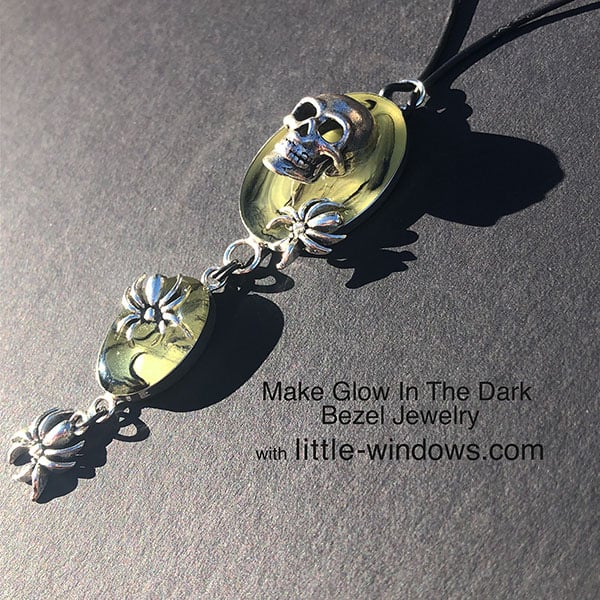
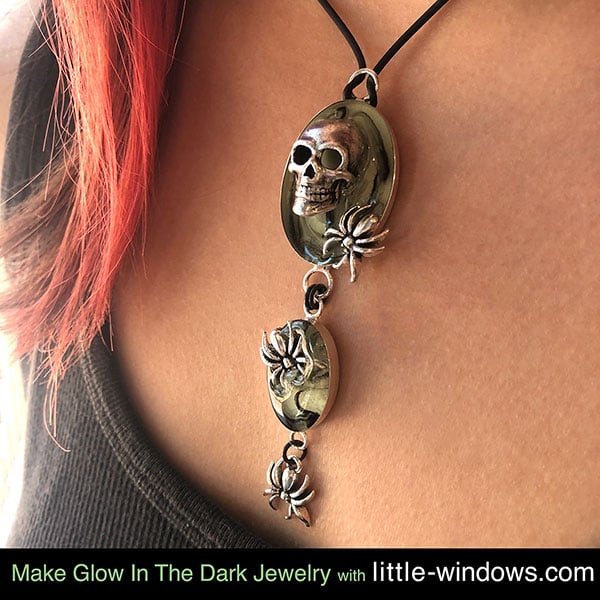
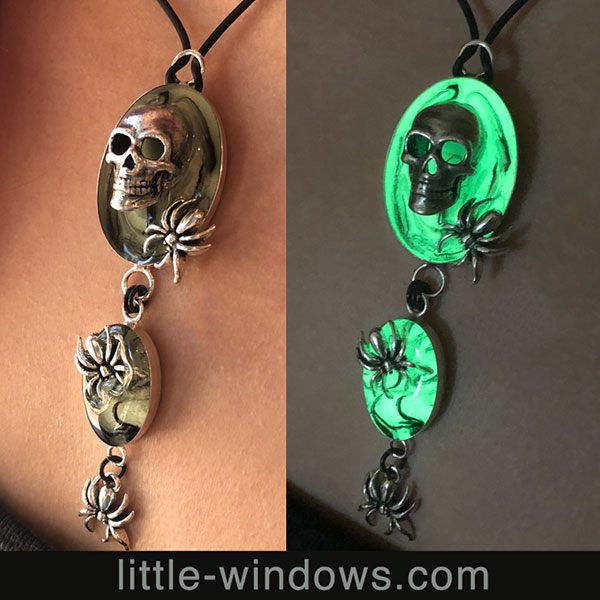
Skull and Spiders Necklace
This piece was created with 1 Medium Oval Bezel and 1 Small Oval Bezel.
Step 1: Pour thin layer of Glow In The Dark Green Additive into bezels, cover and allow to set up for at least 6 hours
Step 2: Pour clear resin layer, up to just below the edge of the bezel sides.
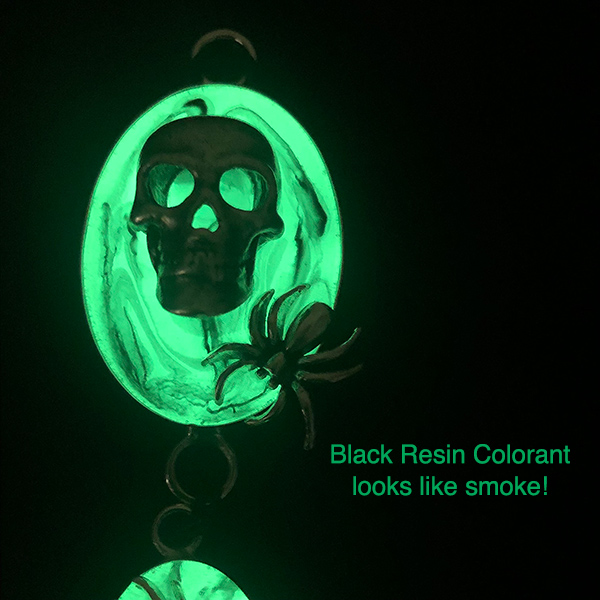
Step 3: Mix Black Resin Colorant into a small amount of clear resin, cover and allow that to thicken for 30 minutes.
Step 4: Use a straight pin to swish colorant through clear resin layer, creating any pattern you want, then cover and allow to set up 6+ hours.
Step 5: Pour another layer of clear resin, slightly doming above the bezel sides, cover and allow to thicken up for 1-1/2 to 2 hours.
Step 6: Resin will still be very sticky. Place your skull and spiders where you want them, and press them down into the resin. Cover and allow to set up for 10-12 hours.
Step 7: Assemble your necklace - fold black rubber cord in half, thread through the top loop, feed back through loop. Use jumprings to link bezels and bottom spider charm together. Using 2 jumprings to connect your sections helps to keep it from flipping backwards.
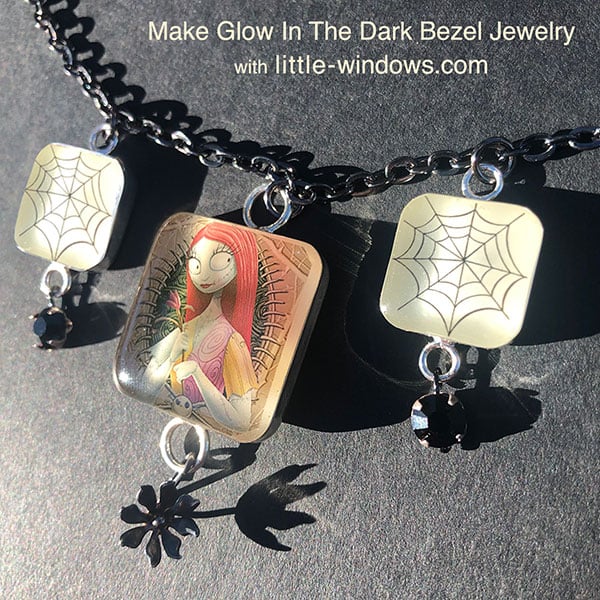
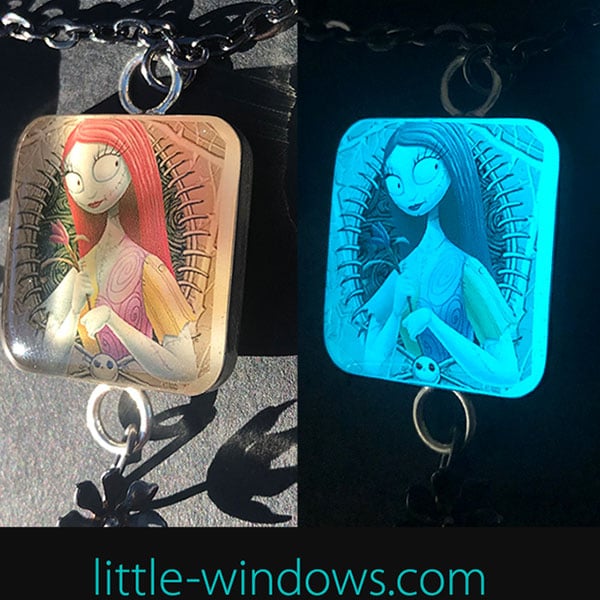
Sally Photo Necklace:
This one uses 1 Medium Square Bezel and 2 Small Square Bezels.
Step 1: You'll need to print your images on Clear Photo Film to fit your bezels. Our online Photo Cropper can do this for you, or you can use Photoshop or GoogleDocs to resize your images.
Step 2: Mix Glow In The Dark Aqua Additive into a small amount of Brilliant Resin. Pour a thin layer of this mix into bezels, cover and allow to set up for at least 3 hours.
Step 3: Pour clear resin layer, up to just even with the bezel sides.
Step 4: Lay cut out photos across the top of the resin in each bezel, use mixing wand or Tiny Pointy Swab to move if necessary. Cover and allow to set up for 3+ hours.
Step 5: Apply clear resin to tops of photos, creating a nice dome. Use mixing wand to pull resin out to all sides. Allow to set up for 12 hours.
Step 6: Assemble your necklace - Use jumprings to link bezels to your chain. Attach charms to the bottom of each bezel.


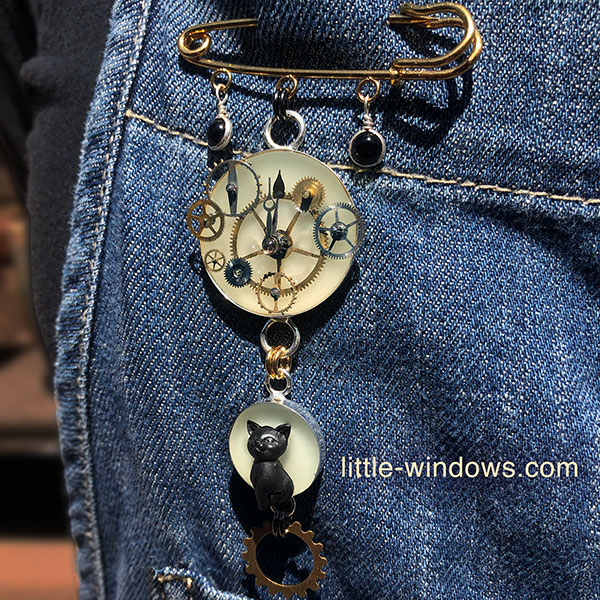
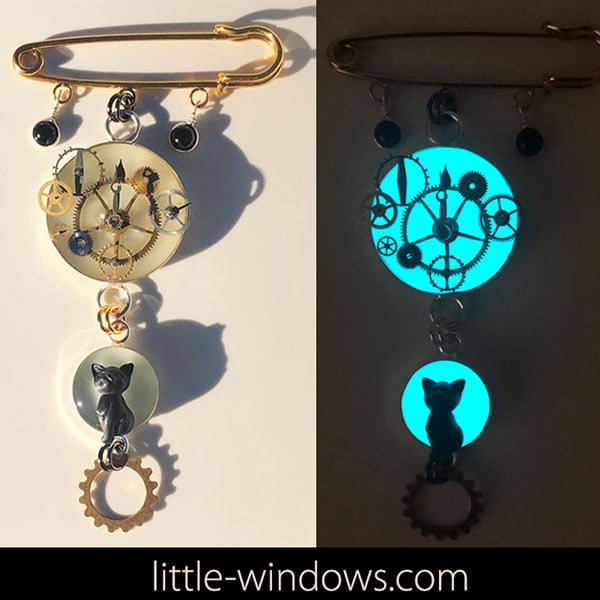
Clock and Cat Pin:
This piece was created with 1 Medium Circle Bezel and 1 Small Circle Bezel. I poured in thin layers to create more dimension between elements.
Step 1: Mix Glow In The Dark Green Additive into a small amount of Brilliant Resin. Pour a thin layer of this mix into bezels, cover and allow to set up for at least 3 hours.
Step2: Pour a thin clear resin layer in Medium Bezel, filling below the bezel edges. Insert gears for first layer and arrange any way you want. Cover and allow to set up for 3+ hours.
Step 3: Pour another clear resin layer in both bezels, doming up slightly above bezel edges. Cover and allow resin to thicken up for 1-1/2 - 2 hours.
Step 4: Use tweezers to arrange more gears / watch hands in your Medium Bezel piece, and the cat figure or any other bits in your Small Bezel. Use tweezers, mixing wand or Tiny Pointy Swab to rearrange if necessary and push elements down into thickened resin to create a ripple effect.
Allow to set up for 12 hours before handling to avoid fingerprints.
Step 5: Assemble your pin - Use jumprings to link bezels and pin elements together. I used 2 heavy jumprings on each connection to keep my piece from flipping backwards. Add charms to side loops on pin and enjoy!
I absolutely love the dimension in this piece!


This looks amazing day and night!
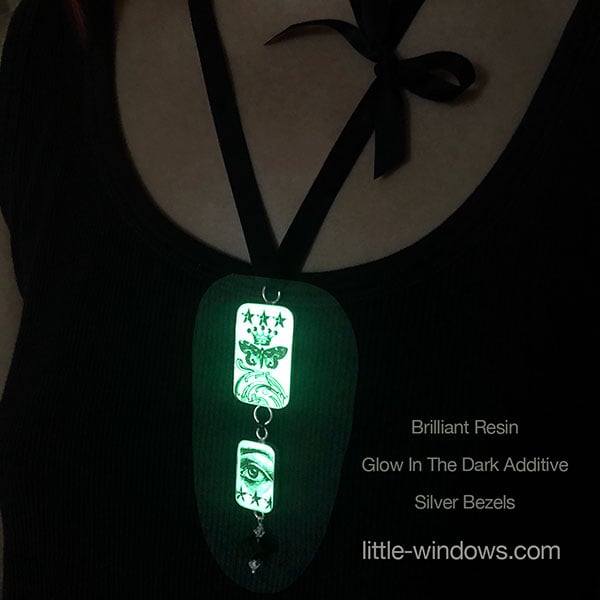
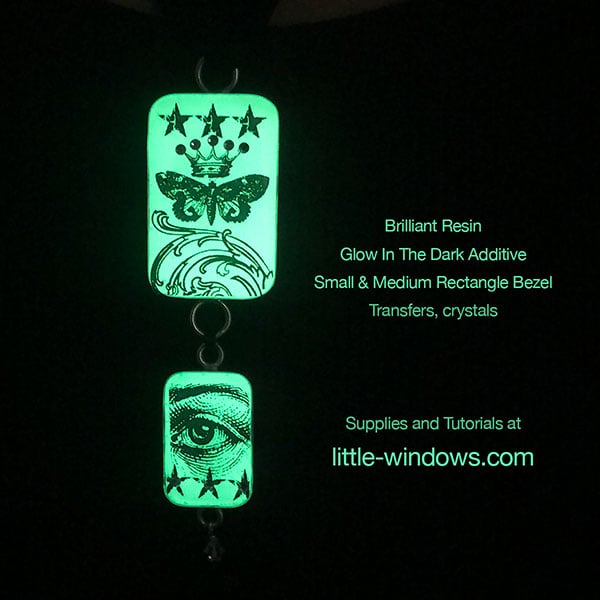
Butterfly Crystal Collage Necklace:
This piece was created with 1 Medium Rectangle Bezel and 1 Small Rectangle Bezel.
Step 1: Mix Glow In The Dark Green Additive into a small amount of Brilliant Resin. Pour a thin layer of this mix into bezels, cover and allow to set up for at least 12 hours.
Step 2: Cut transfers you want to use to size, and rub them down onto the top of your glow-in-the-dark resin layer.
Step 3: Pour a layer of clear resin in both bezels, filling to a nice dome above the bezel edges. Cover and allow resin to thicken up for 1-1/2 - 2 hours.
Step 4: Use Tiny Pointy Swab to position flat back crystals on the top layer of resin in each bezel. Once they are positioned the way you want, use your Swab to push crystals down into thickened resin to create a ripple effect. Allow to set up for 12 hours.
Step 5: Assemble your necklace - Use wire or jumprings to link bezels together. Add charms* to bottom loop and feed ribbon through top loop, tie in a bow or add end caps to the ribbon with a closure if you prefer.
* I used one of our Sterling Silver Headpins with 2 bicone clear crystals and one large black faceted bead to make mine, but you can use anything you'd like from beads to charms.
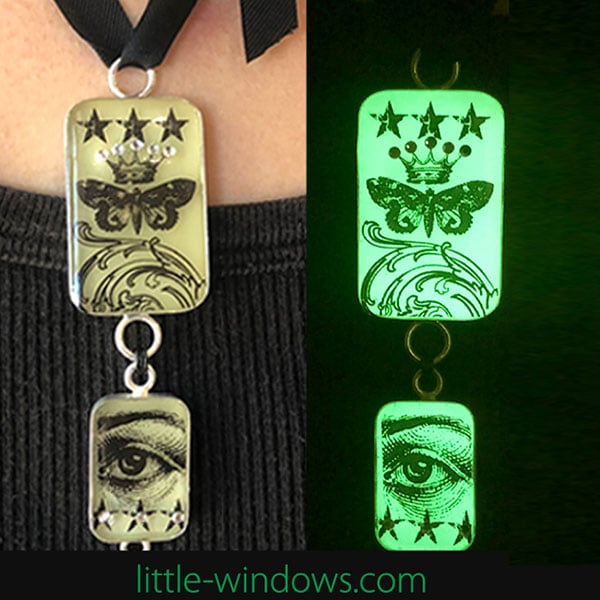
Here you can see this piece looks very different in the sun, indoors after being charged up in the sun, and in the dark.
![]()
Since the crystals are above the resin the facets catch the light and sparkle, and the ripple effect around each one emphasizes them too.
![]()
The ribbon can be tied at any length and makes a comfortable necklace.
![]()
Beautifully spooky glow in the dark projects are made in our quality silver bezels. These glow in the dark resin jewelry projects feature charms, colorant, clear photos, transfers and crystals. Glow in the dark resin jewelry supplies, how-to's, and the best resin craft starter kit for jewelry here at little-windows.com
MORE IDEAS using the same awesome products:
